ghost-on-kubernetes
Ghost on Kubernetes (v6.x) by SREDevOps.Org
Deploy the leading open-source publishing platform, Ghost, on Kubernetes with maximum security and efficiency using a hardened, multi-arch container image.
Maintained by SREDevOps.org: SRE, DevOps, Linux, Ethical Hacking, AI, ML, Open Source, Cloud Native, Platform Engineering in English, Español, and Portugués (Brasil).





Key Highlights: Security & Efficiency
This repository implements Ghost CMS v6.xx.x from @TryGhost (Official) on Kubernetes with a custom built image, which delivers significant improvements for production use and security features in Kubernetes.
Enhanced Security
- Non-Root Execution: Both the Ghost and MySQL components run exclusively as a non-root user (UID/GID 65532) in Kubernetes, preventing potential privilege escalation attacks.
- Distroless Runtime: We utilize Google Container Tools Distroless Debian 13 - NodeJS 22 as the final runtime environment. Distroless images contain only the required application and language dependencies, excluding shells and package managers, making them substantially more secure and reducing the attack surface.
- Vulnerability Reduction: By replacing gosu with a native container execution flow and adopting Distroless, we removed several critical vulnerabilities reported in the original Ghost image:
- Result: This change alone reduced 6 critical vulnerabilities and 34 high vulnerabilities reported by Docker Scout in the official image.
Example Security Reports:
| Ghost Official Image | Ghost on Kubernetes Image |
|---|---|
Example scan for the Ghost Official Image: 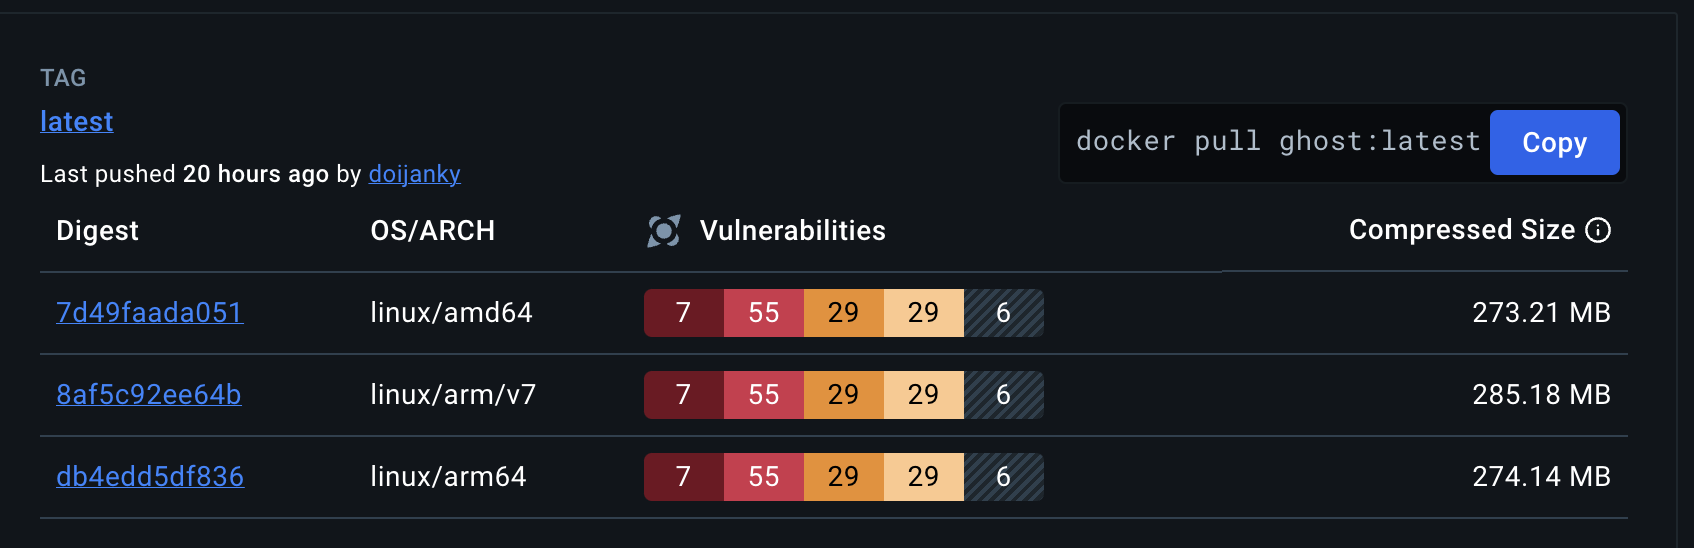 |
Example of our Ghost on Kubernetes Image on Docker Hub: 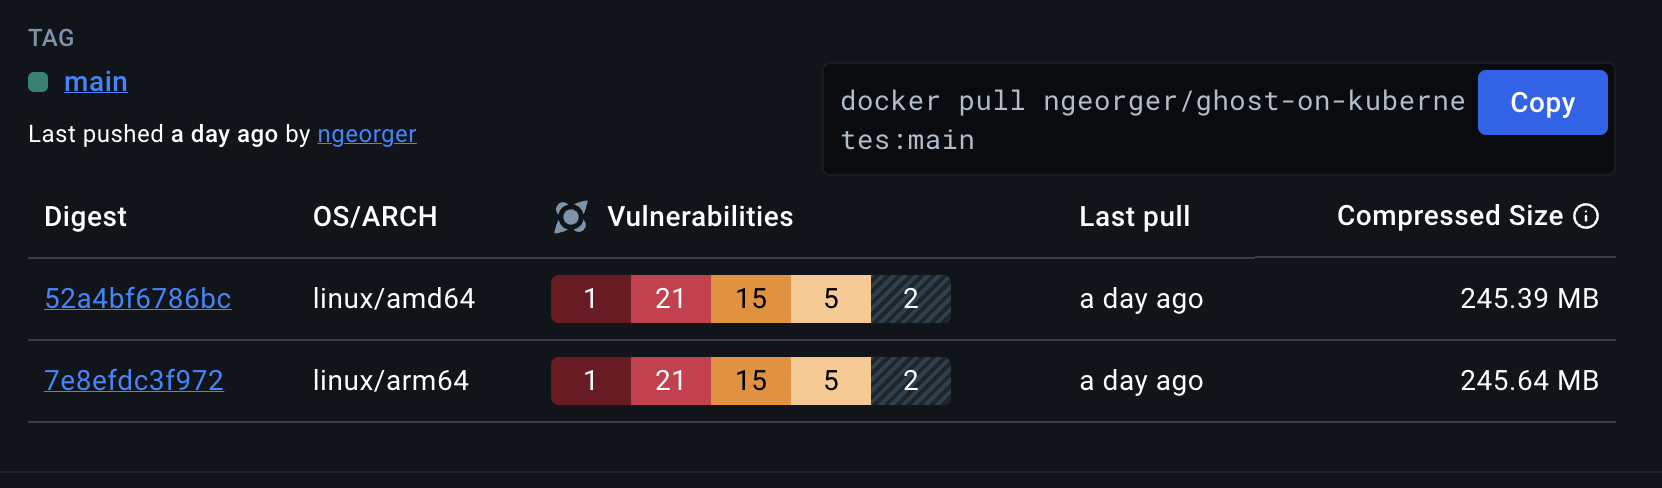 |
Performance & Architecture
- Custom Build Artifacts: We maintain two distinct Dockerfiles for production and development:
- Production Image: The main image built using our hardened, multi-stage build process. See the Dockerfile.
- Development Image: A variant tailored for testing, which bundles SQLite support. See the Dockerfile-dev.
- Multi-Arch Support: Images are built for both amd64 and arm64 architectures.
- Multi-Stage Build: We use the official Node 22 Jod LTS image for building, which significantly reduces the final image size and improves security by removing unnecessary build components.
- Updated Ghost v6 & NodeJS 22 LTS: Using the latest stable versions for security and performance.
- Robust Entrypoint (entrypoint.js): A custom Node.js entrypoint script, executed by the unprivileged user, handles necessary runtime operations like updating default themes before starting the Ghost application. The script can be reviewed here: entrypoint.js.
- Dedicated Init Container: The deployment includes an initContainer to handle directory creation, correct ownership (UID/GID 65532), and permission setting prior to the main Ghost container launch, ensuring seamless operation inside the Distroless container.
Deployment Architecture Overview
This project provides complete Kubernetes manifest files (deploy/) to run a production-ready Ghost instance backed by a MySQL database.
| Resource | Components | Details |
|---|---|---|
| Namespace | ghost-on-kubernetes | Provides logical isolation for all components. (File: 00-namespace.yaml) |
| StatefulSet | ghost-on-kubernetes-mysql | Manages the MySQL 8 database, ensuring stable networking and persistent storage. (File: 05-mysql.yaml) |
| Deployment | ghost-on-kubernetes-valkey | Manages the Valkey cache pods for improved performance. (File: 05-valkey.yaml) |
| Deployment | ghost-on-kubernetes | Manages the Ghost v6 application pods. (File: 06-ghost-deployment.yaml) |
| Services | ghost-on-kubernetes-service, ghost-on-kubernetes-mysql-service, ghost-on-kubernetes-valkey-service | Exposes Ghost (2368), MySQL (3306), and Valkey (6379) internally within the cluster. (File: 03-service.yaml) |
| PersistentVolumeClaims (PVC) | k8s-ghost-content, ghost-on-kubernetes-mysql-pvc, ghost-on-kubernetes-valkey-pvc | Requests persistent storage for Ghost content (themes, images), MySQL data, and Valkey cache data. (File: 02-pvc.yaml) |
| Secrets | ghost-config-prod, ghost-on-kubernetes-mysql-env, ghost-on-kubernetes-valkey-env, tls-secret | Securely stores Ghost configuration, database credentials, Valkey credentials, and TLS certificates (optional). (Files: 01-mysql-config.yaml, 01-valkey-config.yaml, 04-ghost-config.yaml, 01-tls.yaml) |
| Ingress | ghost-on-kubernetes-ingress | Exposes the Ghost application to the outside world via HTTP/HTTPS (requires a TLD). (File: 07-ingress.yaml) |
Note: You can host multiple Ghost instances by replacing the Namespace specification in each manifest file.
Installation Instructions (Production)
Follow these steps to deploy Ghost on your Kubernetes cluster.
Prerequisites
- A functioning Kubernetes cluster (kubectl configured).
- A provisioned StorageClass (required for PVCs).
0. Option 1: Deploy with Helm
Alternatively, you can install the chart from our Helm repository (recommended):
Detailed values and configurations available within Chart readme and Chart values examples
helm repo add sredevopsorg https://sredevopsorg.github.io/ghost-on-kubernetes
helm repo update
helm install my-ghost sredevopsorg/ghost-on-kubernetes \
  --namespace ghost \
  --create-namespace \
  --set ghost.url=https://yourdomain.tld \
  --set persistence.ghost.storageClassName=your-storage-class
0. Option 2: Clone (or fork) the Repository
## Clone the repository
git clone https://github.com/sredevopsorg/ghost-on-kubernetes.git --depth 1 --branch main --single-branch --no-tags
## Change directory
cd ghost-on-kubernetes
1. Review and Configure
Review the example configuration files and modify the manifests in the deploy/ folder to suit your environment (e.g., storage class, domain name, secret values).
- Configurations: Check the example configuration files in the examples/ directory:
- config.production.sample.yaml: Recommended configuration using MySQL 8. Requires a valid top-level domain (TLD) for the url field and Ingress configuration.
- config.development.sample.yaml: Uses SQLite for testing environments.
- Official Ghost Docs: Refer to the official Ghost documentation for detailed configuration options.
2. Deployment Sequence
It is crucial to apply the manifests in the correct order to ensure dependency resolution (especially the database components).
-
Create the Namespace:
kubectl apply -f deploy/00-namespace.yaml -
Create Secrets (Credentials and Config):
# IMPORTANT: Customize these secrets before applying kubectl apply -f deploy/01-mysql-config.yaml kubectl apply -f deploy/01-valkey-config.yaml kubectl apply -f deploy/04-ghost-config.yaml kubectl apply -f deploy/01-tls.yaml -
Create Persistent Storage and Services:
kubectl apply -f deploy/02-pvc.yaml kubectl apply -f deploy/03-service.yaml -
Deploy Database and Cache (StatefulSet and Deployment):
# Wait for the MySQL and Valkey PVCs to be bound kubectl apply -f deploy/05-mysql.yaml kubectl apply -f deploy/05-valkey.yaml -
Deploy the Ghost Application (Deployment):
# Wait for MySQL and Valkey to be ready before starting kubectl apply -f deploy/06-ghost-deployment.yaml -
Expose Ghost with Ingress (Optional/Recommended):
 # Routes external traffic to the Ghost Service
 kubectl apply -f deploy/07-ingress.yaml
Your Ghost Blog is Deployed!
Congratulations! You have deployed a highly secure and scalable Ghost v6 instance on Kubernetes.
Accessing Without a Domain Name (Testing)
To preview the website without configuring Ingress or a TLD, you can use port forwarding:
- Temporarily configure both url and admin URLs in your config.production.json Secret to use
http://localhost:2368/. - Restart the Ghost pod(s) after updating the Secret.
- Run the port-forwarding command:
kubectl port-forward -n ghost-on-kubernetes services ghost-on-kubernetes-service 2368:2368
Alternate image for compatibility with Ghost Docker Hub images
There are three Dockerfiles here used for building image variations:
Dockerfile- The original image for KubernetesDockerfile-dev.dockerfile- Like the original, but sets NODE_ENV=development and includes SQLite3 support. Image tags include-devsuffix.Dockerfile-docker.dockerfile- built for more compatiblity with the “Docker Official” image on Dockerhub:- Image tags include
-dockersuffix - Sets NODE_ENV=production
- Includes SQLite support
- Uses the same root path as Docker Hub image:
/var/lib/ghost - Works outside of Kubernetes
- Image tags include
Dockerfile-docker.dockerfile has an important difference from the Docker Hub different for improved security: By default, files are created with UID of 65532, while Docker Hub uses UID 1000. Because the UID of 1000 is likely to be used by another user on the system, using 65532 is more secure. If you are moving from the Docker Hub image and don’t want to change the ownership of all your files, you can continue to use the same user with this image by specifying --user 100:1000 on a docker run line or updating a compose.yml file where you set image: to also set user: 1000:1000
Contributing
We welcome contributions from the community! Please check the CONTRIBUTING.md file for more information on how to contribute to this project.
License and Credits
- This project is licensed under the MIT License. Please check the LICENSE file for more information.
- The Ghost CMS is licensed under the MIT License.
- The node image and the Distroless image are licensed by their respective owners.